How to create Minium tests
In this section we will try to walk you through on how to create a new end-to-end testing project using a real-world example.
We'll be using Minium Mail, a sample app that was adapted from the folks of flightjs. The application is available at http://minium.vilt.io/sample-app/.
If you just want to jump straight to the finished test project you can check the complete source code in https://github.com/viltgroup/minium-mail-e2e-tests
Create a Minium Cucumber project
First of all, let's create a Minium Cucumber project:
- Launch Minium Developer
- Click on
Project > Create Project - Set the following values
| Field | Value |
|---|---|
| Project type | Cucumber project |
| Parent Directory | some existing directory, e.g. c:\dev |
| Project Name | training-e2e-tests |
| Group ID | minium.training |
| Version | 1.0.0-SNAPSHOT |
| Feature file | send-mail |
| Step file | mail-steps |
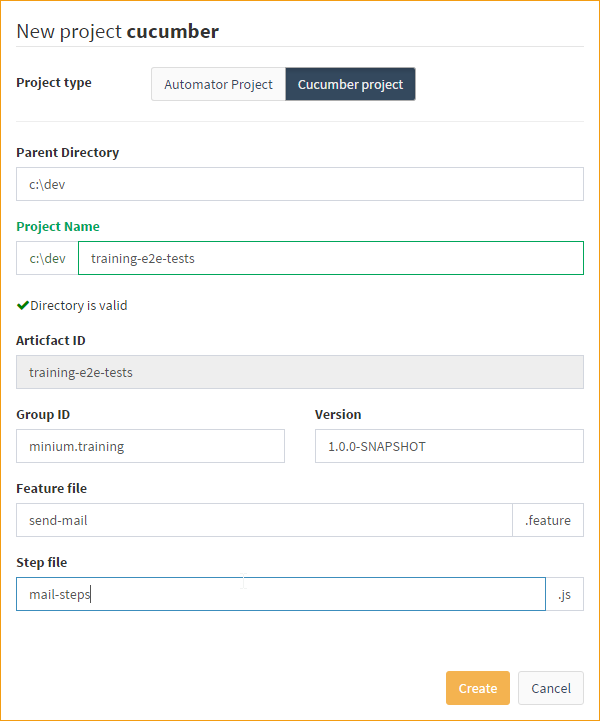
- Click
Create - Minium Developer will refresh and opened the project you just created:
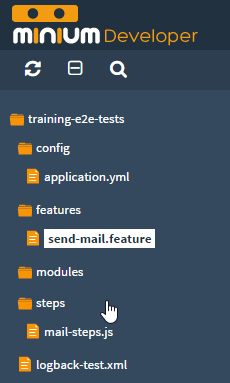
- That project will contain some example code which you can run by opening
features/send-email.featureand pressRun All. If no WebDriver is open, just pick one. You'll see its progress in the editor.
Writing a Scenario
As you already know a scenario is part of a feature, and the scenario itself is made of steps.
To illustrate the use of Minium and Cucumber we will create a user story that tests the functionality of sending emails. The first scenario that we will create is to send an email and verify if the email was really sent.
For that, we will need to:
- Go to the Minium Mail page
- Click on
Composebutton - Fill the new email form
- Click on
Sendbutton - Go to Sent section
- Verify is the email exists
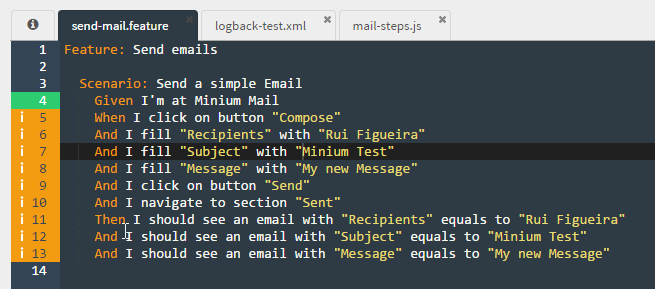
Let's convert those actions into a scenario. For that, just replace all the
content of feature/send-mail.feature with the following:
Feature: Send emails

  Scenario: Send a simple Email
    Given I'm at Minium Mail
    When I click on button "Compose"
    And I fill "Recipients" with "Rui Figueira"
    And I fill "Subject" with "Minium Test"
    And I fill "Message" with "My new Message"
    And I click on button "Send"
    And I navigate to section "Sent"
    Then I should see an email with "Recipients" equals to "Rui Figueira"
    And I should see an email with "Subject" equals to "Minium Test"
    And I should see an email with "Message" equals to "My new Message"
Also, clear all code in steps/mail-steps.js, because it no longer makes sense
for these scenarios.
You can now try to run it by placing the cursor in any line of that scenario and
press Ctrl + Enter or clicking Run:
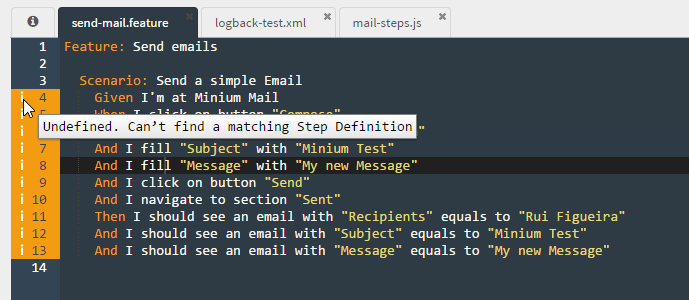
You'll notice that no step will actually run, because they have no implementation yet and are, for that reason, undefined.
Step definitions
The following step must ensure the browser is at our Minium Mail sample app:
Given I'm at Minium Mail
This step needs a step definition to translate plain text into actions that will interact with the system.
To create a step definition for that step, edit steps/mail-steps.js
and add the following code there:
When(/^I'm at Minium Mail$/, function() {
  browser.get("http://minium.vilt.io/sample-app/");
});
That code will instruct Minium cucumber to call that function every time the correspondent regular expression matches a step.
You can now run the scenario again and you'll notice the WebDriver browser will
open the page properly, and that the step Given I'm at Minium Mail will be
marked as green:
Exercise:
Try to implement a step definition for the following step:
When I click on button "Compose"
For it to be generic enough, we'll capture the button text in the step using a regular expression:
When(/^I click on button "(.*?)"$/, function(btnLabel) {
  // your code goes here
});
Then, run the scenario again to ensure it is working properly.
Fill a form
Now we want to fill the new email form. The steps used to fill the form are the following:
When I fill "Recipients" with "Rui Figueira"
And I fill "Subject" with "Minium Test"
And I fill "Message" with "My new Message"
In the figure below we can see the form that we want to fill:

In the step definition, we need to get all the elements of the form (stored in variable inputs). Since we can have different types of elements in a form (e.g. textbox, radio, button, checkbox, option, etc) we need to check the type of the input before we actually fill the form.
When(/^I fill "(.*?)" with "(.*?)"$/, function(fldName, value) {
  // get all elements of the form
  var flds = $("input, textarea, select");

  // find the element by its label
  var fld = flds.withLabel(fldName);

  // check the type of the element
  if (fld.waitForExistence().is("select")) {
    // if the element is a select box
    fld.select(value);
  } else {
    // if the element is a textbox
    fld.fill(value);
  }
});
Try to run the scenario. You'll notice the form was filled, and the Send
button was pressed because the same step definition responsible for clicking the
Compose button was triggered.
Exercise:
Implement the And I navigate to section "Sent" step. You'll need to consider
the fact that, after pressing the Send button, the modal backdrop will still
be there and so you will need to wait for it to fade out and disappear. You'll
get extra points if you use the base expression pattern.
Assertions
Now we want to validate if the email that we send was actually sent. For that we will navigate to the section "Sent" and validate the data.
The steps used to validate if the email was sent are the following:
Then I should see an email with "Recipients" equals to "Rui Figueira"
And I should see an email with "Subject" equals to "Minium Test"
And I should see an email with "Message" equals to "My new Message"
The steps above will match the step definition below:
Then(/^I should see an email with "(.*?)" equals to "(.*?)"$/, function(field, value) {
    //find the rows of the table
  var headers = $("#mail-list th");
  var cells = $("#mail-list td");

  var header = headers.withText(field);
  var cell = cells.below(header).withText(value);

    //do the assertion
    expect(cell).to.have.size(1);
});
Add it to steps/mail-steps.js and run the scenario once again. It should now
complete successfully.
Configuration values
In config/application.yml under your project, you can find all your Minium
configuration (for instance, which default browser to use, browser window
dimensions, etc.). In this file, you can also use ${minium.resources.dir} to
reference the resources directory, in which the files required to execute the tests
can be stored.
There is, however, a special configuration block under minium.config: that
is configuration you can add and use in your application. In your javascript
code, you can access all its properties under the variable config.
Exercise:
Edit the application.yml and change it to have a property baseUrl with the
URL of Minium Mail sample app:
minium:
  webdriver:
   ...
   config:
     baseUrl: http://minium.vilt.io/sample-app/
     uploadDir: ${minium.resources.dir}/upload
That baseUrl property is now under the variable config, so you can evaluate
the following code in the javascript console:
config.baseUrl // it evaluate into "http://minium.vilt.io/sample-app/"
You can even add complex configuration there:
minium:
  webdriver:
   ...
  config:
    baseUrl: http://minium.vilt.io/sample-app/
    users:
      administrator:
        username: admin
        password: strong_password
    fruits:
      - banana
      - orange
      - strawberry
We can now refactor our first step definition to use config.baseUrl instead of
the hardcoded value:
When(/^I'm at Minium Mail$/, function() {
  browser.get(config.baseUrl);
});
Data tables
We can refactor our feature file using tables. Tables are useful for specifying a larger data set and are more readable.
Scenario: Send an Email

  Given I'm at Minium Mail
  When I click on button "Compose"
  And I fill:
    | Recipients | Rui Figueira   |
    | Subject    | Minium Test    |
    | Message    | My new Message |
  And I click on button "Send"
  And I navigate to section "Sent"
  Then I should see an email with:
    | Recipients | Rui Figueira   |
    | Subject    | Minium Test    |
    | Message    | My new Message |
When we are using tables, the step definition needs to be changed. For the following steps using tables:
When I fill:
  | Recipients | Rui Figueira   |
  | Subject    | Minium Test    |
  | Message    | My new Message |
The step definition is now receiving a datatable as argument with the
information of the table. What we need to do is iterate over the elements of the
table and fill the form with them. See here
the methods available to transform DataTable objects.
When(/^I fill:$/, function(datatable) {
  var flds = $("input, textarea, select");

  // get the values of the datatable creating an object like:
  // {
  //   "Contact": "Rui Figueira",
  //   "Subject": "Minium Test",
  //   "Message": "My new Message"
  // }
  var values = datatable.rowsHash();

  // iterate over the elements of the datatable
  for (var fldName in values) {
    var fld = flds.withLabel(fldName);
    var val = values[fldName];

    if (fld.is("select")) {
      fld.select(val);
    } else {
      fld.fill(val);
    }
  }
});
Modules
With Minium you can also create modules, in order to help you keeping your code clean, organized and reusable. A module is a standard object literal containing methods and properties.
For this example we can create a module to fill the form of the email. Create a
new file modules/forms.js and paste the following code there:
var forms = {

  fill : function (vals) {
    for (var fldName in vals) {
      var value = vals[fldName];

      var fld = base.find("input, textarea, select").withLabel(fldName);

      if (fld.waitForExistence().is("select")) {
        fld.select(value);
      } else {
        fld.fill(value);
      }
    }
  },

  submit : function () {
    var btn = base.find("submit");

    btn.click();
  }
};

if (typeof module !== 'undefined') module.exports = forms;
After creating your module you can simply call it this way:
var forms = require("forms"); // or require("forms.js")

//  start composing an email
$("#compose").click();

forms.fill({ "Recipients": "Minium Bot" });
forms.submit();
So in your step definition, you can now use the module.
//require the form module
var forms = require("forms");

When(/^I fill:$/, function(datatable) {
  var values = datatable.rowsHash();

  //use the function of the module
  forms.fill(values);
});
Background
Sometimes you will find yourself repeating the same Given steps in all of the
scenarios in a feature.
You can move and group those steps under a Background section before the fisrt scenario. The background runs before each one of your scenarios.
Feature: Delete Emails

  Background:
    Given I'm at Minium Mail

  Scenario: Delete an email
    Given an email with Subject "Minium Can!" exists
    When I delete an email with Subject "Minium Can!"
    And I navigate to section "Trash"
    Then I should see an email with:
      | Subject | Minium Can! |

  Scenario: Delete an email from trash
    Given I'm at section "Trash"
    And an email with Subject "Phasellus vitae interdum nulla." exists
    When I delete an email with Subject "Phasellus vitae interdum nulla."
    Then I shouldn't see an email with:
      | Subject | Minium Can! |
Scenario Outlines
In the follwoing scenarios, the steps are the same, only the data changes.
Scenario: Send an Email
    When I click on button "Compose"
    And I fill:
      | Recipients | Rui Figueira   |
      | Subject    | Minium Test    |
      | Message    | My new Message |
    And I click on button "Send"
    And I navigate to section "Sent"
    Then I should see an email with:
      | Recipients | Rui Figueira   |
      | Subject    | Minium Test    |
      | Message    | My new Message |

Scenario: Send an Email
    When I click on button "Compose"
    And I fill:
      | Recipients | Mario Lameiras                                         |
      | Subject    | BDD + Minium                                           |
      | Message    | Egestas morbi at. Curabitur aliquet et commodo nonummy |
    And I click on button "Send"
    And I navigate to section "Sent"
    Then I should see an email with:
      | Recipients | Mario Lameiras                                  |
      | Subject    | BDD + Minium                                    |
      | Message    | Egestas morbi at. Curabitur aliquet et commodo  |
We can refactor this scenarios using Scenario outlines. Scenario outlines allow
us to write more concisely Scenarios through the use of a template with
placeholders, using Examples with tables and < > delimited parameters. The
following Scenario is the same as the one above.
Scenario Outline: Send simple emails
  When I click on button "Compose"
  And I fill:
    | Recipients | <to>      |
    | Subject    | <subject> |
    | Message    | <message> |
  And I click on button "Send"
  And I navigate to section "Sent"
  Then I should see an email with:
    | Recipients | <to>      |
    | Subject    | <subject> |
    | Message    | <message> |

  Examples:
    | to             | subject      | message                                        |
    | Rui Figueira   | Minium Test  | My New messages                                |
    | Mario Lameiras | BDD + Minium | Egestas morbi at. Curabitur aliquet et commodo |
Autocomplete
If you want to have some help writing your steps, you can add in your
config/application.yml of your cucumber project the step's that you are
writing. This way you will have auto-completion features for those step's.
minium:
  webdriver:
   ...
  cucumber:
    snippets:
      - name: "Given I'm at Minium Mail"
      - name: "When I click on button \"...\""
      - name: "When I fill \"...\" with \"...\""
      - name: "When I navigate to section \"...\""
      - name: "Then I should see an email with \"...\" equals to \"...\""
Load external data
Sometimes, the application that you want to test can have dynamic data, and the data of the tests also need to be dynamic. In order to be able to have dynamic data in your tests, Minium allows you to parametrize the table row values and replace them with external data loaded from an excel or a CSV
Load Data in Data Tables
1- Describe your scenario as Gherkin in a normal feature file.
Scenario: Send an Email
   When I click on button "Compose"
   And I fill:
     | Recipients | Rui Figueira   |
     | Subject    | Minium Test    |
     | Message    | My new Message |
   And I click on button "Send"
   And I navigate to section "Sent"
   Then I should see an email with:
     | Recipients | Rui Figueira   |
     | Subject    | Minium Test    |
     | Message    | My new Message |
2 - Tag the data table section with #@source:<your-file-with-the-data>
Your Scenario will like:
Scenario: Send an Email
   When I click on button "Compose"
   And I fill:
     # @source:data/data-table.csv
     | Recipients | Rui Figueira   |
     | Subject    | Minium Test    |
     | Message    | My new Message |
   And I click on button "Send"
   And I navigate to section "Sent"
   Then I should see an email with:
     # @source:data/data-table.csv
     | Recipients | Rui Figueira   |
     | Subject    | Minium Test    |
     | Message    | My new Message |
3 - Create an Excel file or a CSV file, with the same structure.
Recipients,Minium Bot
Subject,Minium Test with Loaded Data
Message,New Messages with Loaded Data
Make sure that the format of the external file where the data will be loaded is the same of the feature.
Result with external data loaded
When the scenario will be executed, Minium will replace your data table with the data of the external source.
For this example your scenario will become:
Scenario: Send an Email
   When I click on button "Compose"
   And I fill:
     # @source:data/data-table.csv
     | Recipients | Minium Bot                      |
     | Subject    | Minium Test with Loaded Data    |
     | Message    | New Messages with Loaded Data   |
   And I click on button "Send"
   And I navigate to section "Sent"
   Then I should see an email with:
     # @source:data/data-table.csv
     | Recipients | Minium Bot                      |
     | Subject    | Minium Test with Loaded Data    |
     | Message    | New Messages with Loaded Data   |
Load Data in Scenarios Outlines
1- Describe your scenario outline as Gherkin in a normal feature file.
Scenario Outline: Send simple emails
  When I click on button "Compose"
  And I fill:
    | Recipients | <to>      |
    | Subject    | <subject> |
    | Message    | <message> |
  And I click on button "Send"
  And I navigate to section "Sent"
  Then I should see an email with:
    | Recipients | <to>      |
    | Subject    | <subject> |
    | Message    | <message> |

  Examples:
    | to             | subject      | message                                            |
    | Rui Figueira   | Minium Test  | My New messages                                    |
    | Mario Lameiras | BDD + Minium | Egestas morbi at. Curabitur aliquet et commodo     |
    | Mario Lameiras | Lorem ipsum  | Lorem ipsum dolor sit amet, consectetur adipiscing |
2- Tag the Examles section of the scenario outline with #@source:data.xlsx
Scenario Outline: Send simple emails
  When I click on button "Compose"
  And I fill:
    | Recipients | <to>      |
    | Subject    | <subject> |
    | Message    | <message> |
  And I click on button "Send"
  And I navigate to section "Sent"
  Then I should see an email with:
    | Recipients | <to>      |
    | Subject    | <subject> |
    | Message    | <message> |

  Examples:
    #@source:data/data.csv
    | to             | subject      | message                                             |
    | Rui Figueira   | Minium Test  | My New messages                                     |
    | Mario Lameiras | BDD + Minium | Egestas morbi at. Curabitur aliquet et commodo      |
    | Mario Lameiras | Lorem ipsum  | Lorem ipsum dolor sit amet, consectetur adipiscing  |
3- Create an Excel or a CSV file, with the same structure.
The CSV for this case will have the following format:
to,subject,message
Minium Bot,Minium Data load,My New messages loaded
Rapahel Rodrigues,Test CSV, Testing
Mario Lameiras,BDD + Excel,Egestas morbi at. Curabitur aliquet et commodo
4- When your feature will be executed it will become:
Scenario Outline: Send simple emails
  When I click on button "Compose"
  And I fill:
    | Recipients | <to>      |
    | Subject    | <subject> |
    | Message    | <message> |
  And I click on button "Send"
  And I navigate to section "Sent"
  Then I should see an email with:
    | Recipients | <to>      |
    | Subject    | <subject> |
    | Message    | <message> |

  Examples:
    #@source:data/data.csv
    | to                | subject      | message                                          |
    | Minium Bot        | Minium Test  | My New messages loaded                           |
    | Rapahel Rodrigues | BDD + Minium | Testing                                          |
    | Mario Lameiras    | BDD + Excel  | Egestas morbi at. Curabitur aliquet et commodo   |
Preview and validate a feature in Minium Developer
You can preview, validate and execute your feature with the external data in Minium Developer.
1- Go to Run > Preview Feature with external data
2- It will open a new editor with the feature with the data from the external file.
If there's an error that means that the feature with the loaded data is not valid. Please check if the data is correct and well formatted.
If you have a scenario like:
Scenario: Send an Email
   When I click on button "Compose"
   And I fill:
     # @source:data/data-table.csv
     | Recipients | Rui Figueira   |
     | Subject    | Minium Test    |
     | Message    | My new Message |
And the data-table.csv like:
Recipients,Minium Bot
Subject,Minium Test with Loaded Data
Message,New Messages with Loaded Data
The feature will become:
Scenario: Send an Email
   When I click on button "Compose"
   And I fill:
     # @source:data/data-table.csv
     | Recipients | Minium Bot                      |
     | Subject    | Minium Test with Loaded Data    |
     | Message    | New Messages with Loaded Data   |
Tips
-
Create a folder
datain your project and put theres your external resources. -
Try not to load files with hardcoded paths from your machine. Because this way it will work only in your machine.
-
Make sure that the format of the external file where the data will be loaded is the same of the feature.
Supported formats
- .csv
- .xls
- .xlsx
You can check the complete source code in https://github.com/viltgroup/minium-mail-e2e-tests